Tuesday 25 November 2014

How to Install Custom Template In Blogger

how-to-set-custom-template-in-blogger

In this article we will discuss a very important trick i.e. Changing or installing a custom template in your blog. This is very important topic in the blog-sphere as this is vital for every blogger and web developer to make his blog or website look attractive and user friendly. Blogger is a product of Google and they are supporting many kinds of themes or templates for their users but sometimes you feel those templates or themes too mainstream for your blogs as they are quite simple and has less widgets or gadgets, so there is a method by following which one can change the said interface of his BlogSpot. Changing the theme of your website in blogger is quite easy and you can do this in few minutes just by paying a little attention to the written article.

  • First of all you need to be sure which custom template/theme you want to install, there are thousands of customized or newly developed Themes available on web and hundreds of programmers and developers are still working on developing new and more optimized SEO friendly templates. You can choose your desired one by searching one on Google or sites like Templateism, DesignerBlogs and BTtemplates. These sites will provide you a variety of well optimized blogger templates and you will be able of choosing a good one for your Blog.
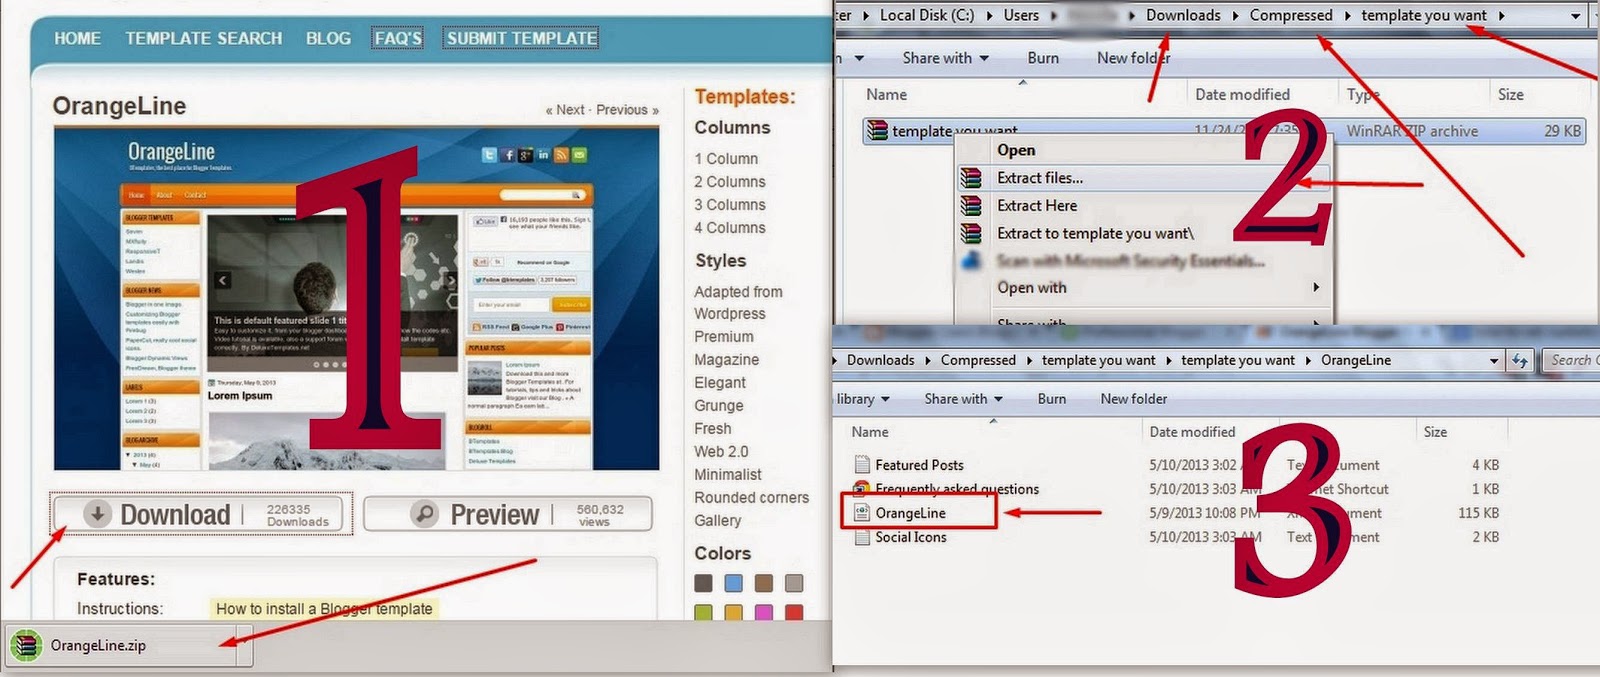
  • After that you need to download the one you want to upload. The download will be available in .rar file format and you have to unzip that file, after doing that you will get a .XML file which would be having a code for your theme and all that code will be working on the back end of your blogger. You need to save that file somewhere you have access to.

how to set customized template in blogger

  • Now you are required to go to the Blogger interface there on the main page you will see a Template section on the left side. The whole menu is being displayed on this side and the second last option is of Template.

installing customized template for your blogger


  • After clicking to the Template section a new window will be opened and that will have few option which are being showed in the above picture. If you click the Download full template button it will download the backup of the old template and this will prevent the loss of your old code. This download the same type of XML file you unzip in last step.
  • Now you need to upload the XML file by going in to the Choose file option and then by clicking OK.
  • Now you are all done with the installment of a new customized template/theme in your blogger or blog.

Wednesday 19 November 2014

How To Add Sitemap To Google Webmaster Tools

How To Add Sitemap To Google Webmaster Tools

In this post we shall discuss one of the most important topics related to the blogging world and the step every blogger and web developer has to take in the start of the blog as it is a vital part of the blogging. Most of the bloggers that have a blog on Blogger or WordPress might have heard the sentence from some colleagues or senior bloggers "Add your website to the Webmaster tools of the Google", but this article has been written for those who want to know the way by which they can add the sitemap of the site in the GMWT. This can be done by following a few steps and hence making your blog recognizable to the crawlers of Google, so that whenever the engine crawls for a result a user enters on the search engine your related post or article could come in the results of the search.

The steps one can follow to add the site map to the web master tools is simple and can be understood easily by following the article below.

  • First of all you need to enter the URL in the address box of your browser, and that Link is "https://www.google.com/webmasters/tools/". After opening this link a new tab will be opened on your browser and you will witness a page like this:

Adding Sitemap in Google Webmaster Tools GWM


  • Now what you have to do is to add the link of you blog, website, or blog spot in the box enclosed with black color you can copy paste your link in there. After entering the address of your web site you need to click the red button having a text ADD A SITE on it.
  • When you click the button a new screen will be open which might ask for the verification of your site if Google doubts the link you entered. In that case you need to download the HTML file being shown on the screen or the code Webmaster has given to you.

adding-blog-to-the-google-webmaster-tools

Adding Sitemap to Google Webmaster Tools

  • After being done with the steps written above you have to go to the interface of the Google WMT. There you have to go to the sitemap sections placed on the left side of the interface. There you can add your Site map. Multiple sitemaps can also be added to the web-master but the basic sitemap you need to enter is:

/atom.xml?redirect=false&start-index=1&max-results=500

The others few you can add are:

/atom.xml?redirect=false
/feeds/posts/default?orderby=updated

These can be done by clicking the Button having text Add/Test Sitemap which on the right side of the web-master.

sitemap submission to webmaster tools

After doing this you have to click the submit sitemap option and you will be all done with submitting the sitemap in the Google Webmaster Tools.
Thanks..!